Introduction
An impulse response (IR) is an acoustic fingerprint of physical or virtual space. There are several ways to produce impulse responses.
- Send a short broadband signal into a room and record the corresponding room-reflections.
- Send a broadband sine sweep into a room and record the corresponding room-reflections. Use a special deconvolve software ( for example Pinguin HDIR-Creator ) to create the impulse response.
- Send a 1 sample big rectangle signal through a digital reverberation unit. Record the output.
Andreas, Andrei, Armin, Matthias, David, Dominique, Oleg, Greg, Ralph, Martijn, Kenan, Lonnie, Benjamin, Manuj, Mario, Alex, Neil, Nico, Roberto, Richard, Sandor, Aaron, Tom, Thierry, Thomas, Thomas, John, Wolfgang
Installation
Mac
Open the dmg-File you have downloaded and double-click on the containing pkg-File. Select "continue" on the welcome screen. If you see the "Select the Destination" screen, you can click "continue" as well. Then, select "Install" and enter your admin password. The actual setup software will start afterwards.
Please click on the "I agree" button if you agree to the "License and Legal Information".
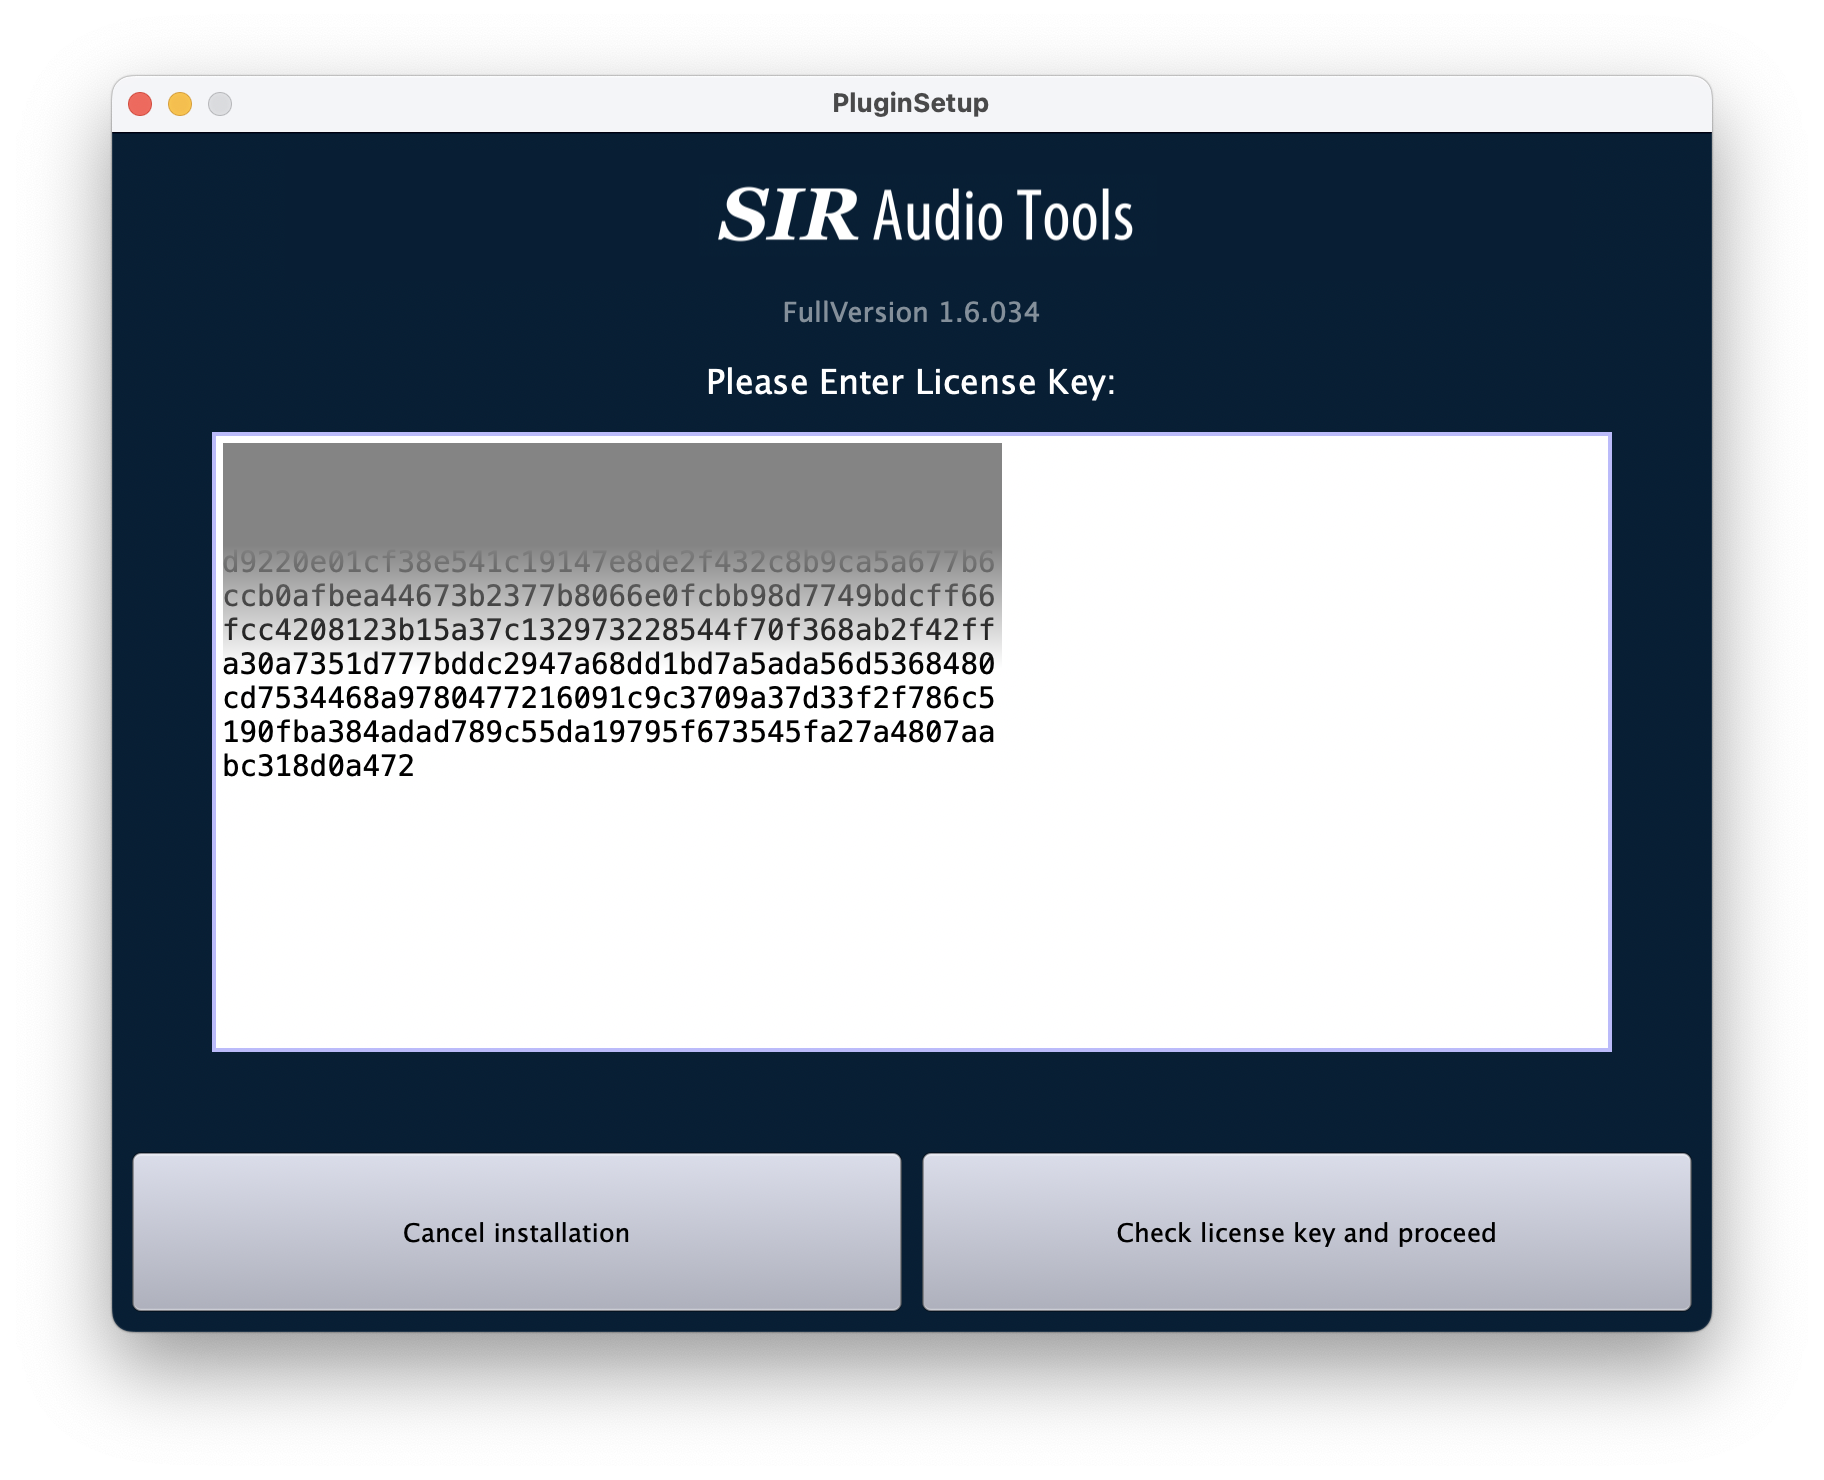
If this is a first-time installation, the license key will be requested at this point. First, copy the license key from the mail you received after purchasing the software. If you can't find your license key, please make use of our License-Key Recovery Tool.
Select the license key and press the key combination "Command" + C, so that you can copy it. To paste the license key into the input field of the installer, press the key combination "Command" + V.
If the license-key isn't accepted:
- Please check again that you are using the correct product installer and not accidentally using an installer for another product. Also check that you are not accidentally using a license key for another product. If you are no longer sure, you can also request your license keys using our License-Key Recovery Tool.
- Sometimes it also happens that a license key is changed by an automatic translation service and is therefore invalid. This often affects Spanish or French-speaking users. Please make sure that such a translation function is deactivated.
- If this doesn't solve the problem, please take a screenshot of the installer after you have inserted the license key and send it to us. We will analyse the problem promptly and send you a feedback.
The correct plugin paths for VST, VST3 and AAX plugin formats are pre-configured automatically. If you want, you can change them manually, but that is not recommended. Press "Install Now!" and confirm the installation settings.
Windows
Open the zip-File and double-click on the containing setup executable-file.
The unpacking process may take a while. Once it's over, you'll see a Windows notification asking "Do you want to allow this app to make changes to your device?" Please select YES.
Please click on the "I agree" button if you agree to the "License and Legal Information".
If this is a first-time installation, the license key will be requested at this point. First, copy the license key from the mail you received after purchasing the software. If you can't find your license key, please make use of our License-Key Recovery Tool.
Select the license key and press the key combination "Control" + C, so that you can copy it. To paste the license key into the input field of the installer, press the key combination "Control" + V.
If the license-key isn't accepted:
- Please check again that you are using the correct product installer and not accidentally using an installer for another product. Also check that you are not accidentally using a license key for another product. If you are no longer sure, you can also request your license keys using our License-Key Recovery Tool.
- Sometimes it also happens that a license key is changed by an automatic translation service and is therefore invalid. This often affects Spanish or French-speaking users. Please make sure that such a translation function is deactivated.
- If this doesn't solve the problem, please take a screenshot of the installer after you have inserted the license key and send it to us. We will analyse the problem promptly and send you a feedback.
Choose the correct plugin paths for VST, VST3 and AAX plugin formats. If you are not sure where the plugin directory of your DAW software is located, please look into the manual, or use the settings dialog of your DAW. Please make sure that the host is using the same architecture (32bit/64bit) as the plugin.
De-installation
General
Mac
Download the installation package and double-click on the containing PKG File, then click on:
"Continue" -> "Install"
The custom de-installation process starts afterwards.
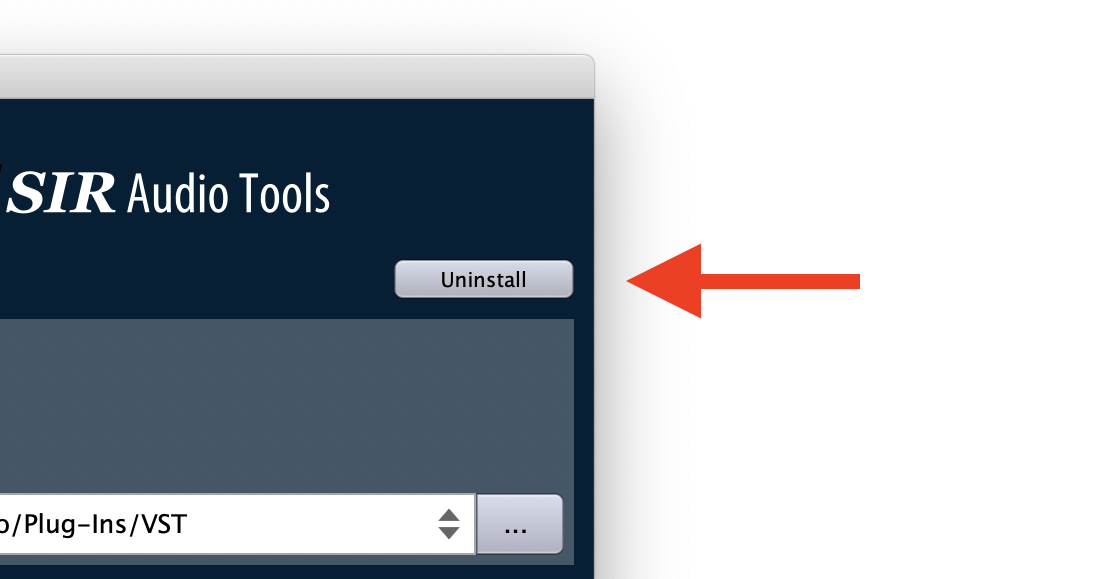
Accept the license agreement and click on the "Uninstall"-button at the top right corner. To finalize the process, click the "Uninstall Now!" button.
Windows
Additional Files
Mac
/Users/username/Music/Audio Music Apps/SIR Audio Tools
Windows
%APPDATA%\SIR Audio Tools
User Interface Overview
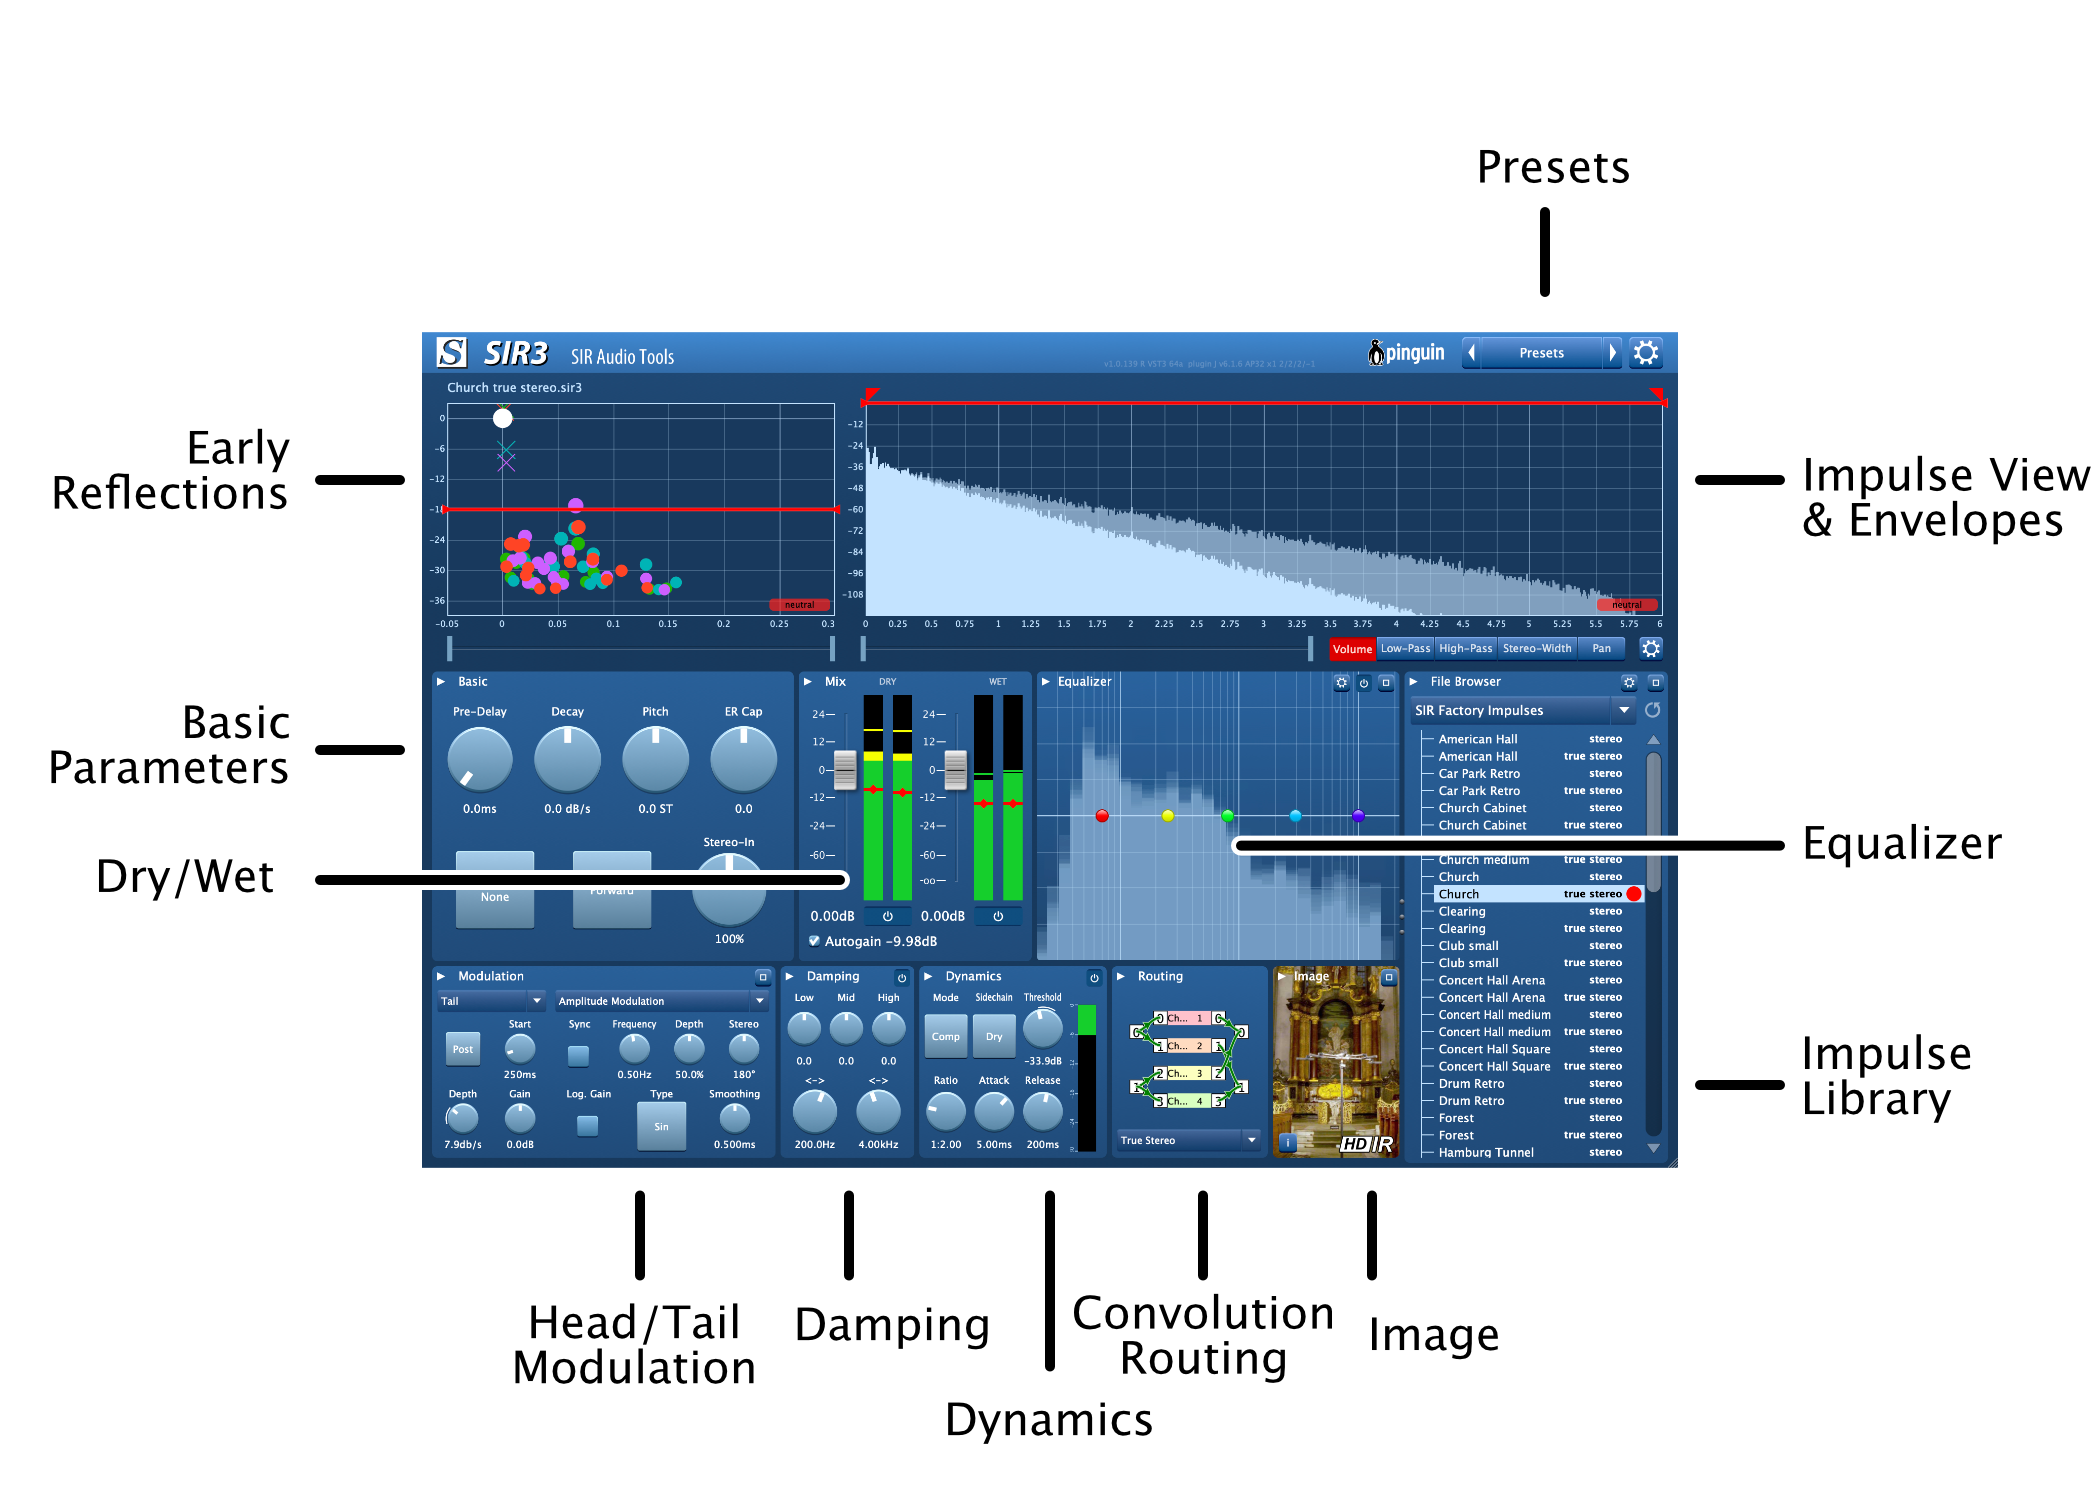
Signal Flow & Control
Overview

Basic
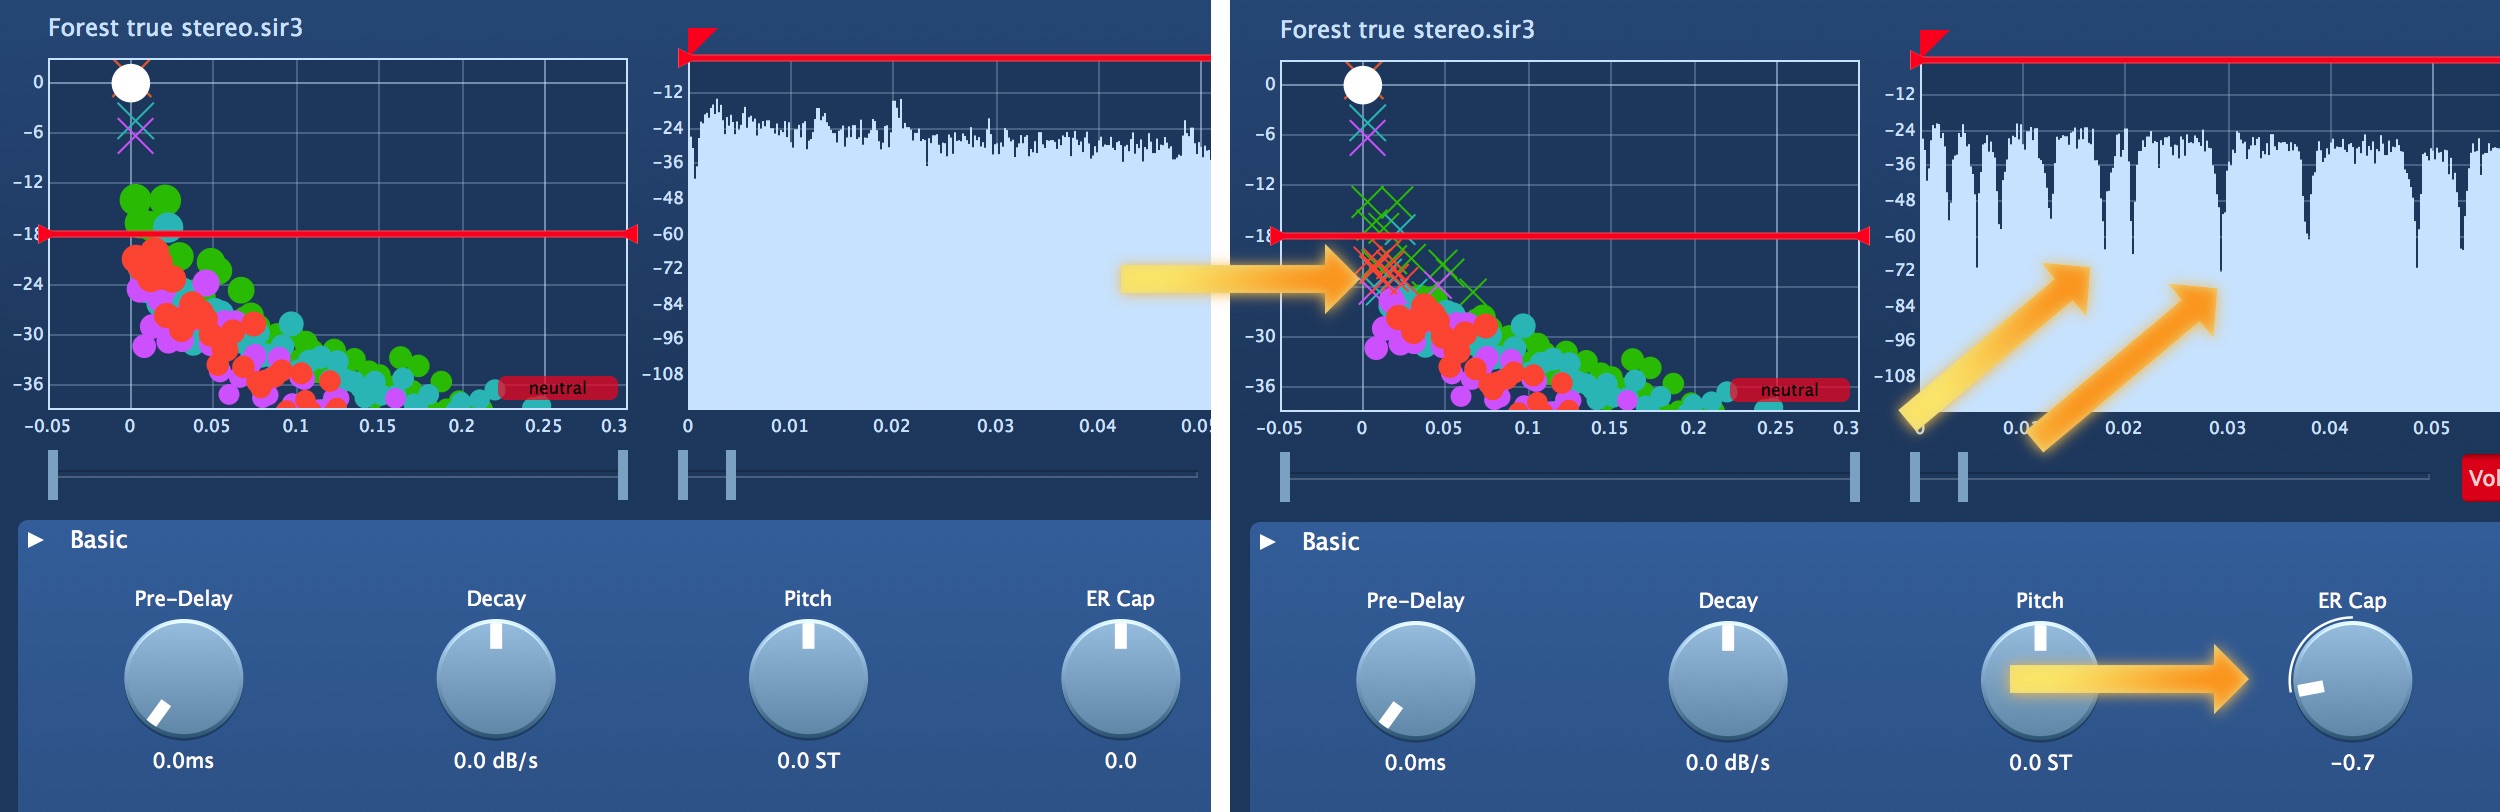
Pre-Delay
The higher the value, the closer the signal will appear to the listener, because the time between the direct (dry) signal and first reflections will be longer, as it would be in a natural recording. Because if the microphone is closer to the signal source, the direct (dry) signal will reach the microphone sooner than the reflections.
Usually, this is often used with a vocal signal and other signals that should stay in the front of the mix. Also, this is a good method to ensure that the mixed dry/wet does not sound blurry. Use a double click to reset this parameter.
Decay
Pitch
ER Cap
Negative values mean that all reflections above threshold will be deactivated, positive values will remove reflections below the threshold. Lowering the early reflections leads to a more transparent room impression, while lifting the room lets it appear more vivid. The detection of early reflections is limited to a dynamic range of 40dB and a timespan of the first 300ms of the impulse response.
Direct
"On" means that you can use the "Dry-Information" of an impulse response for a very realistic reverberation.
NOTE: If you are using this, please mute the dry-signal ( 4.2 Wet & Dry ) to avoid flanging.
If you use the plugin as a send effect, this option should generally be disabled.

Forward/Reverse
Stereo-In
Wet & Dry
You can mute the wet/dry signal by clicking the on/off button below the fader.
"Autogain" is an automatic volume compensation, you can turn it on/off by clicking on the button. This feature is useful when you are browsing through different Impulse Responses, to avoid adjusting the wet level every time you select a new item.
Use a double click to reset dry and wet level to 0dB.
Equalizer / Analyzer
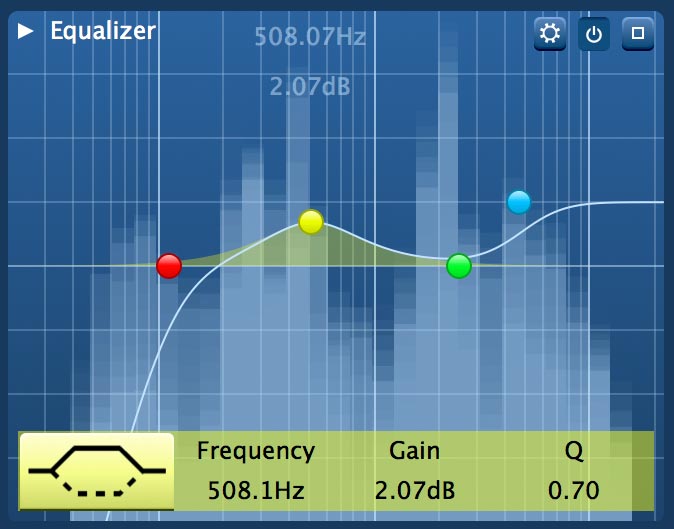
If a knob isn't accessible because it appears behind the floating menu, move the mouse away from the equalizer, the floating panel will automatically disappear. The spectrum analyzer, which can be configured either as an analog IIR like analyzer or as an FFT-style analyzer, displays the frequency spectrum of the wet signal. You can switch between both modes via right mouse-click.
File Browser / Libraries
There are two built-in file locations:
SIR User Impulses
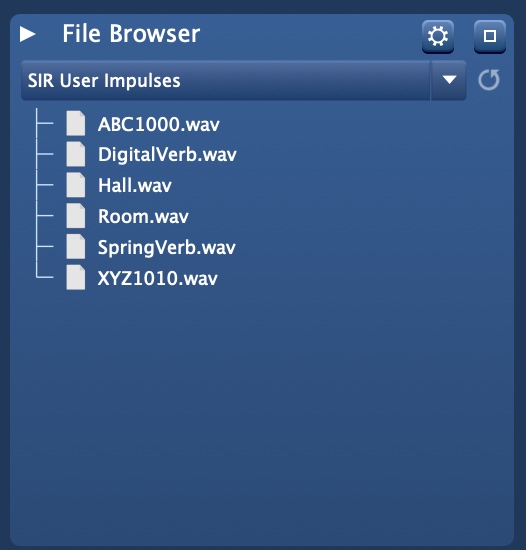
SIR Factory Impulses
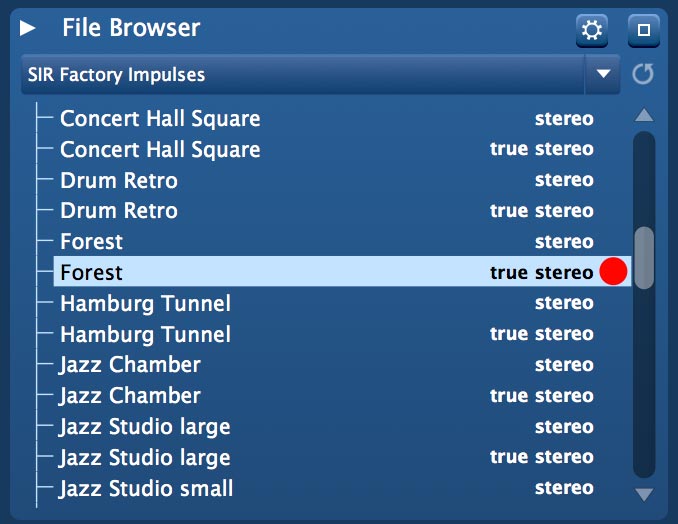
Please do not use this folder for your own impulses, because it will be overwritten when updating SIR3. Instead use the "SIR User Impulses" folder.
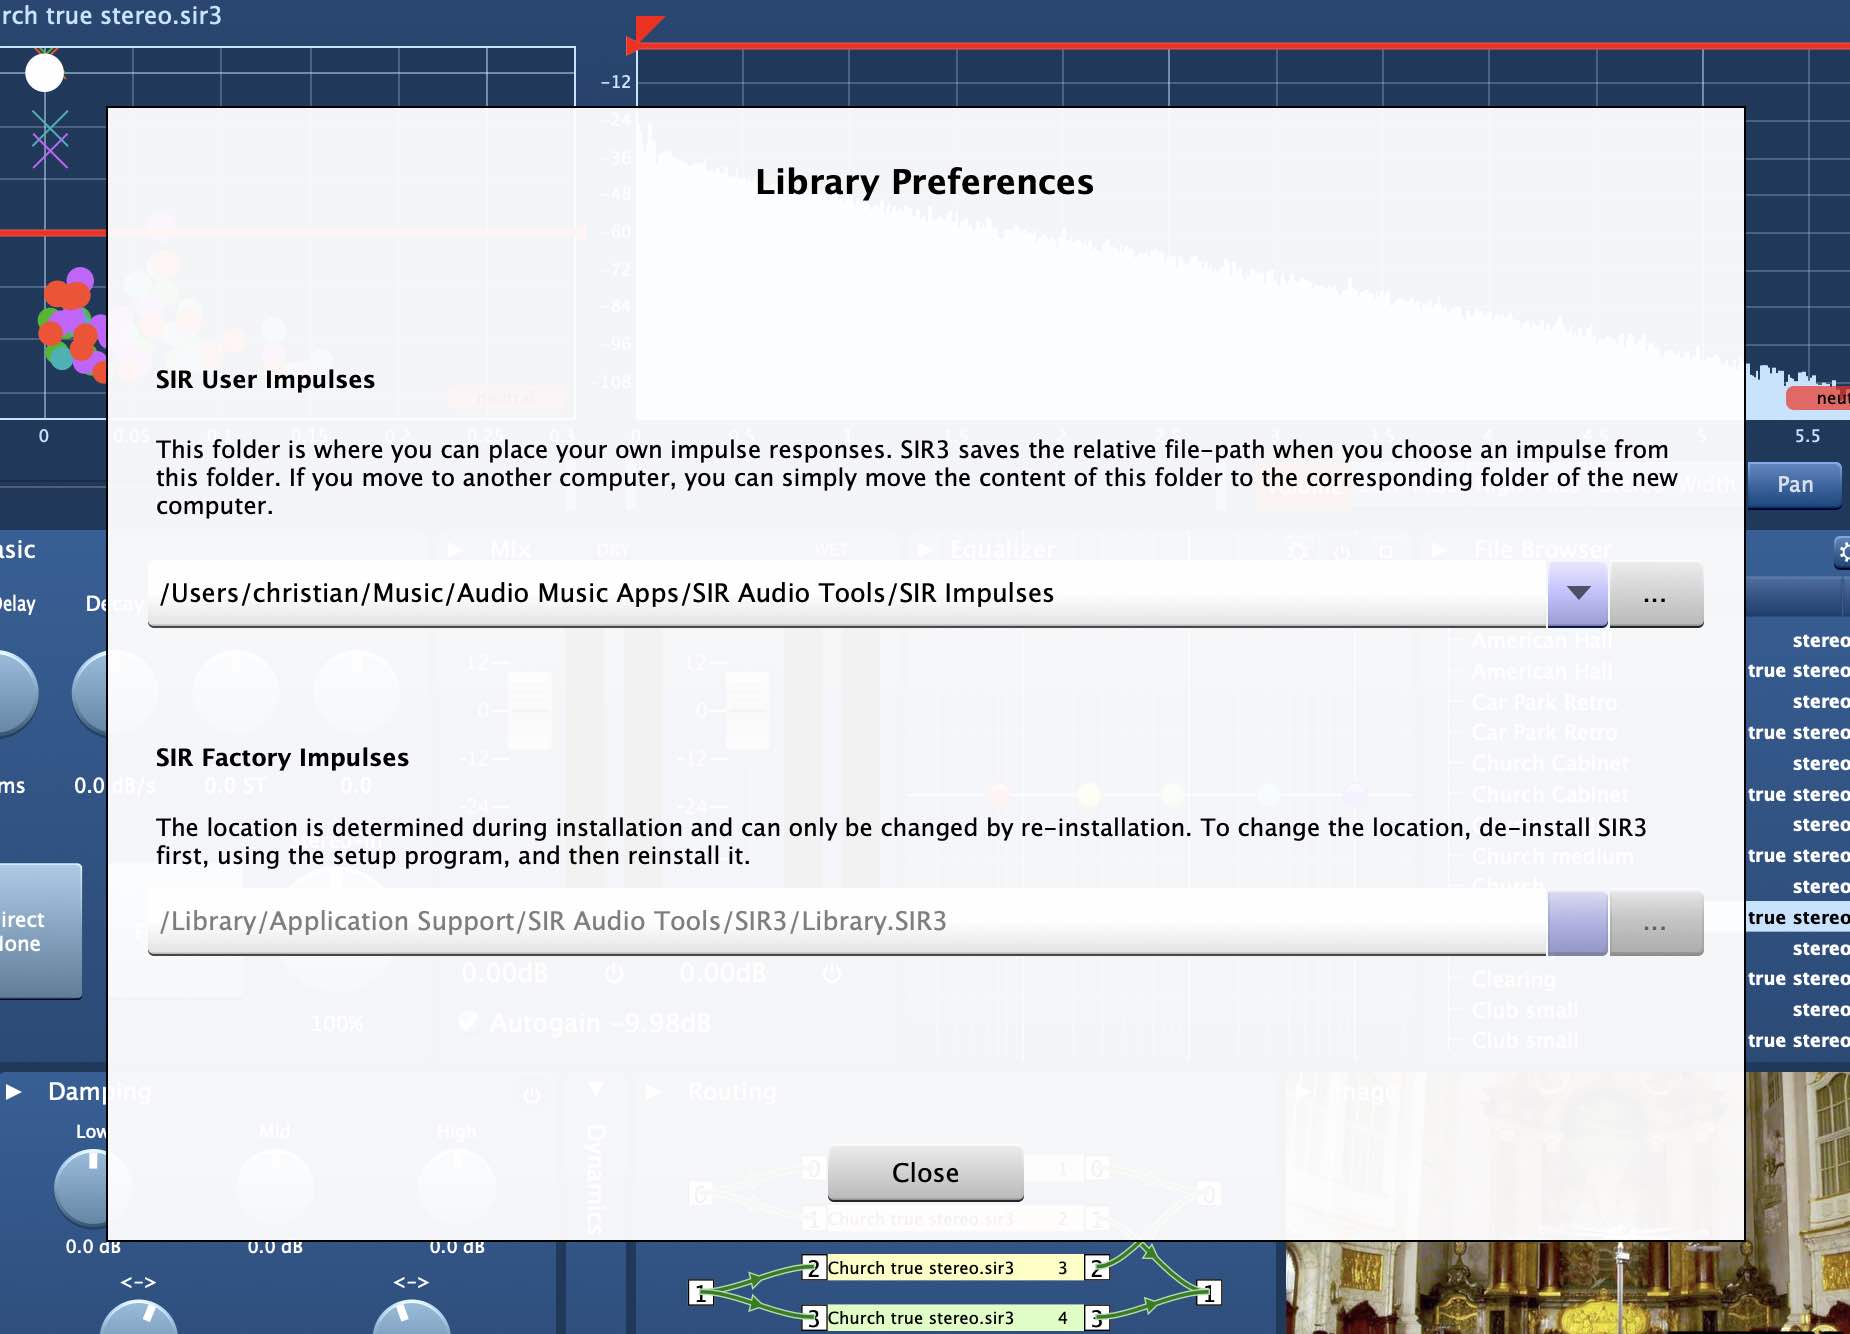
The location of the "SIR User Impulses" can be changed in the "Library Preferences" (accessible via the option button in the upper right corner).
Formats
- *.sir SIR2 specific Impulse Response Format
- *.sir3 SIR3 specific Impulse Response Format
- *.wav Waveform audio format
- *.aiff/aif Audio Interchange File Format
- *.flac Free Lossless Audio Codec
- *.ogg OGG-Files (not recommended for impulse responses, because this format is not lossless)
Drag & Drop
Click to Load
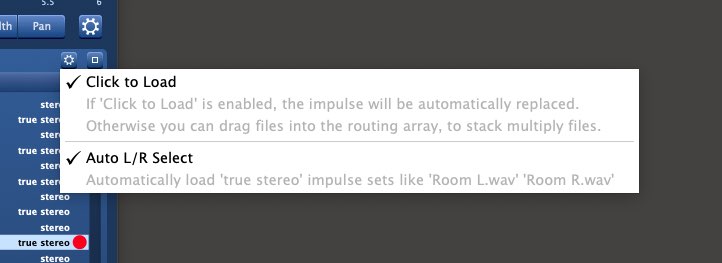
Auto L/R Select
Modulation
Target
Head
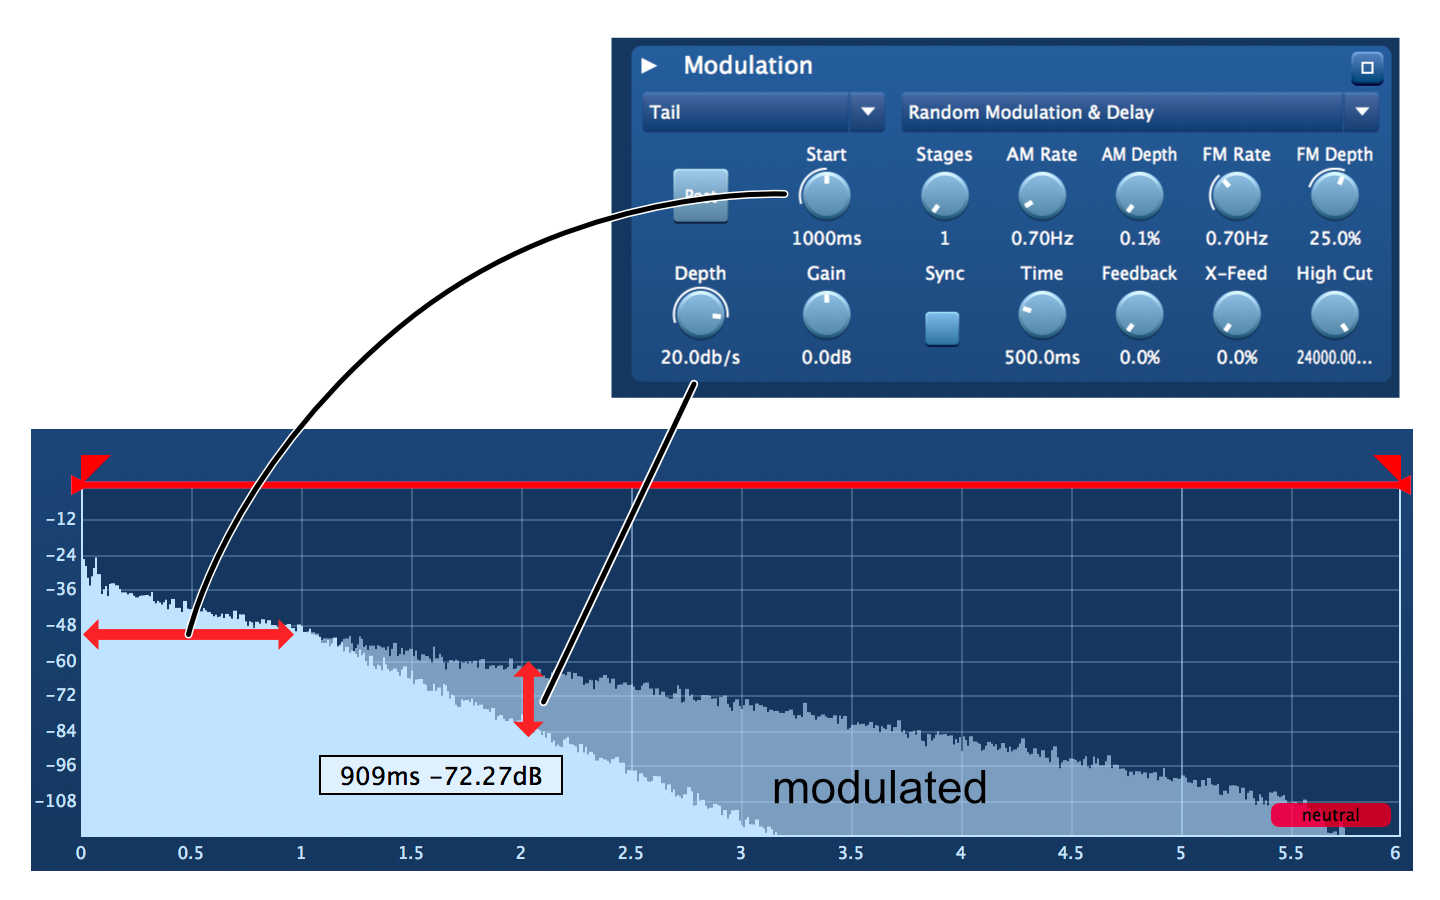
Tail
Full
Pre/Post
Start
Depth
Gain
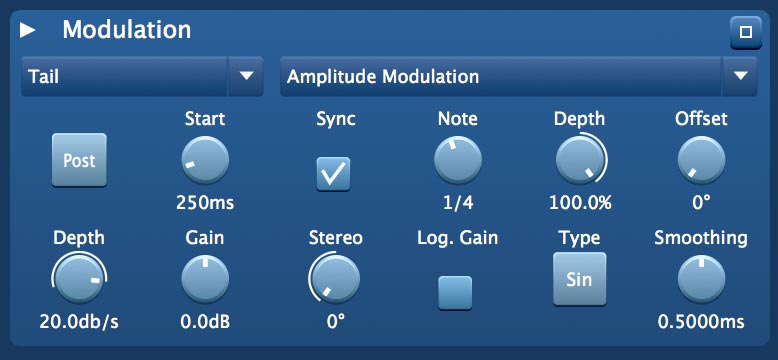
Modulation Type: Amplitude Modulation
YouTube videos are not displayed on this page, because no consent was given that external cookies may be set. If you want give consent for all cookies (for the embedding of YouTube videos, advertising, analytics and social media integration), click on the button:
Accept all cookiesMore Information
Sync
Frequency / Note
Depth (Amplitude Modulation)
Stereo
Log. Gain
Type
Smoothing
Modulation Type: Random Modulation & Delay
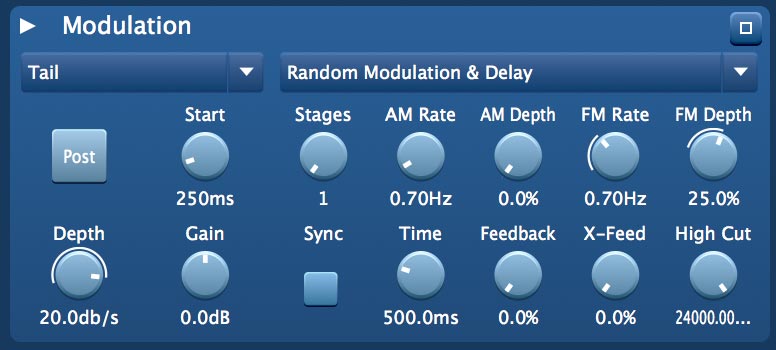
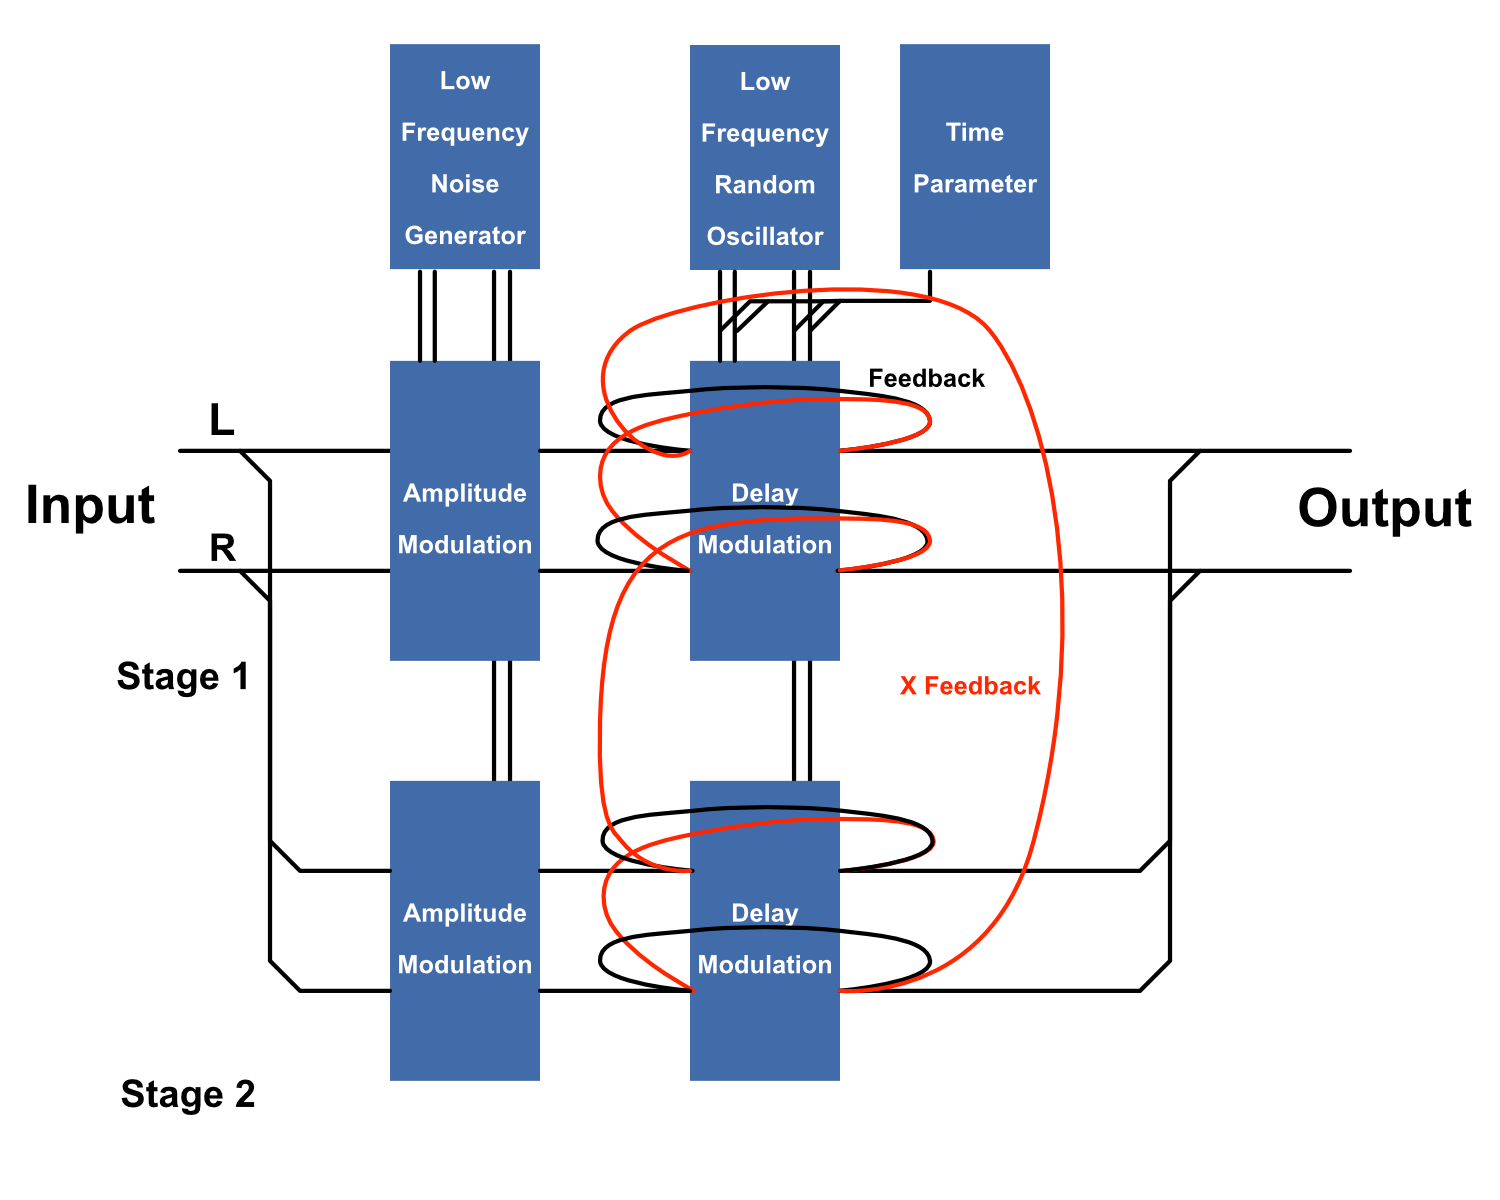
Stages
AM Rate
AM Depth
FM Rate
FM Depth
Sync
Time / Note
Feedback
X-Feed
If you use two stages, the feedback path goes from 1. stage left → 1. stage right → 2. stage left → 2. stage right → back to 1. stage left.
If you use three stages, the feedback path goes from 1. stage left → 1. stage right → 2. stage left → 2. stage right → 3. stage left → 3. stage right → back to 1. stage left.
High-Cut
Damping
Example: If you want to have a longer decay in the mid-frequency range, drag the middle dial to a higher value.
Use the two dials at the bottom to set the cutoff frequencies which divide the three different frequency ranges: Low, Mid and High.
Dynamics
Technical Note: Both compressor and gate use an RMS level (root mean square, with exponential decreasing window) in the sidechain detection.
YouTube videos are not displayed on this page, because no consent was given that external cookies may be set. If you want give consent for all cookies (for the embedding of YouTube videos, advertising, analytics and social media integration), click on the button:
Accept all cookiesMore Information
Parameters
Mode
In gate-mode, the "wet"-signal will be reduced when the sidechain signal falls below the threshold level.
In compressor-mode, the "wet"-signal will be reduced when the sidechain is above the threshold level, the impact is controlled with the ratio parameter.
Sidechain
With "wet", the wet signal will be controlled by itself (like a normal compressor/gate).
With "dry", the detected dry signal loudness will control the loudness of the wet signal. In "gate" mode, whenever the dry-signal is above the threshold level, the "gate" opens and you hear the reverb signal. This can be used for the so called "gated reverb"-effect on drums or any other instruments.
If you select the "compressor" mode, you can reduce the amount of reverb with the dry loudness. For example, the reverb signal will be reduced while you hear the voice, but will be louder in the pauses.
Threshold
Reduction (gate only)
Ratio (compressor only)
Attack
Hold (gate only)
Release
Reduction Meter (compressor only)
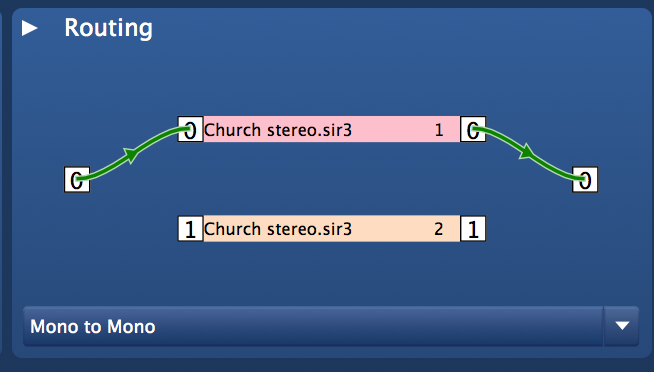
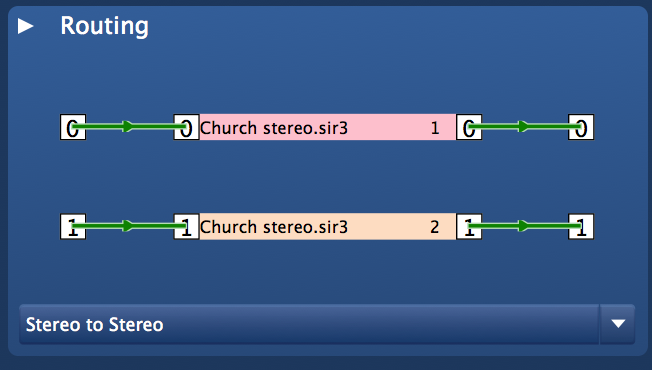
Routing
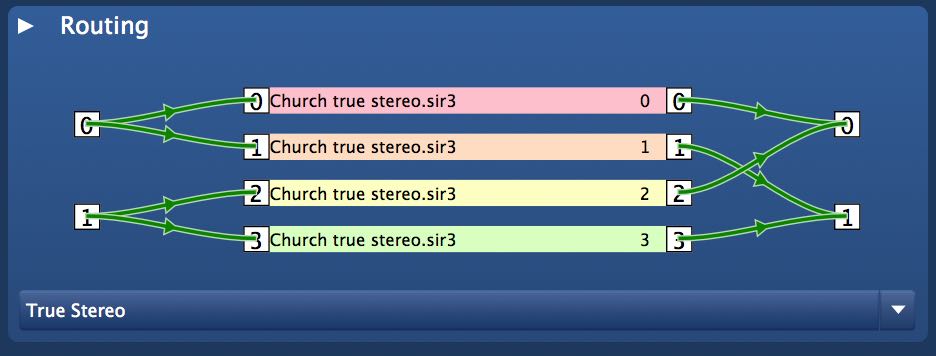
By clicking on the channel routing display you can toggle between "Stereo to Stereo", "True Stereo" and other possible modes.
True Stereo is only possible with a 4 channel impulse response File.
mono to mono
stereo to stereo
stereo in (mono impulse) to stereo

Best for mono (100% stereo compatible) reverbs.
mono to stereo
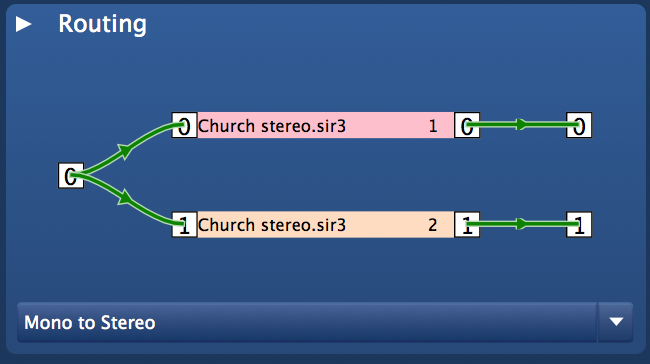
True Stereo
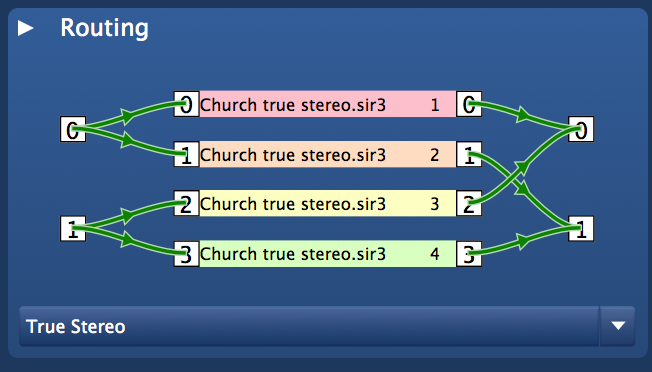
Left input channel will be convoluted with IR-channel 1, the result will be added to the left output.
Left input channel will be convoluted with IR-channel 2, the result will be added to the right output.
Right input channel will be convoluted with IR-channel 3, the result will be added to the left output.
Right input channel will be convoluted with IR-channel 4, the result will be added to the right output.
True Stereo is only possible with a 4-channel impulse response File.
You can generate a 4-channel impulse-response-file by merging two special 2-channel Wav-Files together.
Image
If an IR file does not have an image, SIR3 automatically searches in the same directory for a JPG or PNG file with the same filename but with "jpg" or "png" as an extension (test.wav => test.jpg). If no file with the same name is found, the first "jpg" or "png" listed in the directory is used as the image.
Early Reflections Control Diagram
These are very important for the perception of the character of the room.
Every reflection is symbolized as a point, every channel uses a different color.
You can change their loudness by dragging and changing the envelope. To remove points from the envelope, use the right mouse click.
You can reset the envelope by clicking with the right mouse-click somewhere in the diagram.
Impulse Display & Envelopes
Zoom
Envelopes
Select the envelope you want to modify by clicking on the envelope selector.
Volume
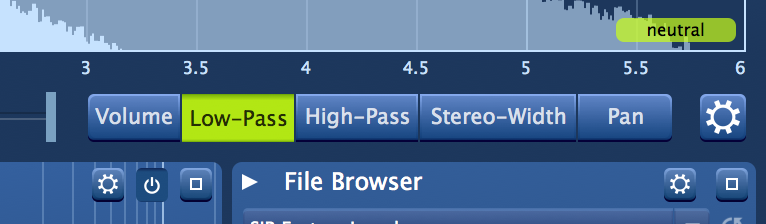
Low-Pass
High-Pass
Stereo-Width
This envelope is also very handy when it comes to creating a mono-reverb – just drag the left and the right point to the bottom of the display.
Pan
Start/Stop Locator

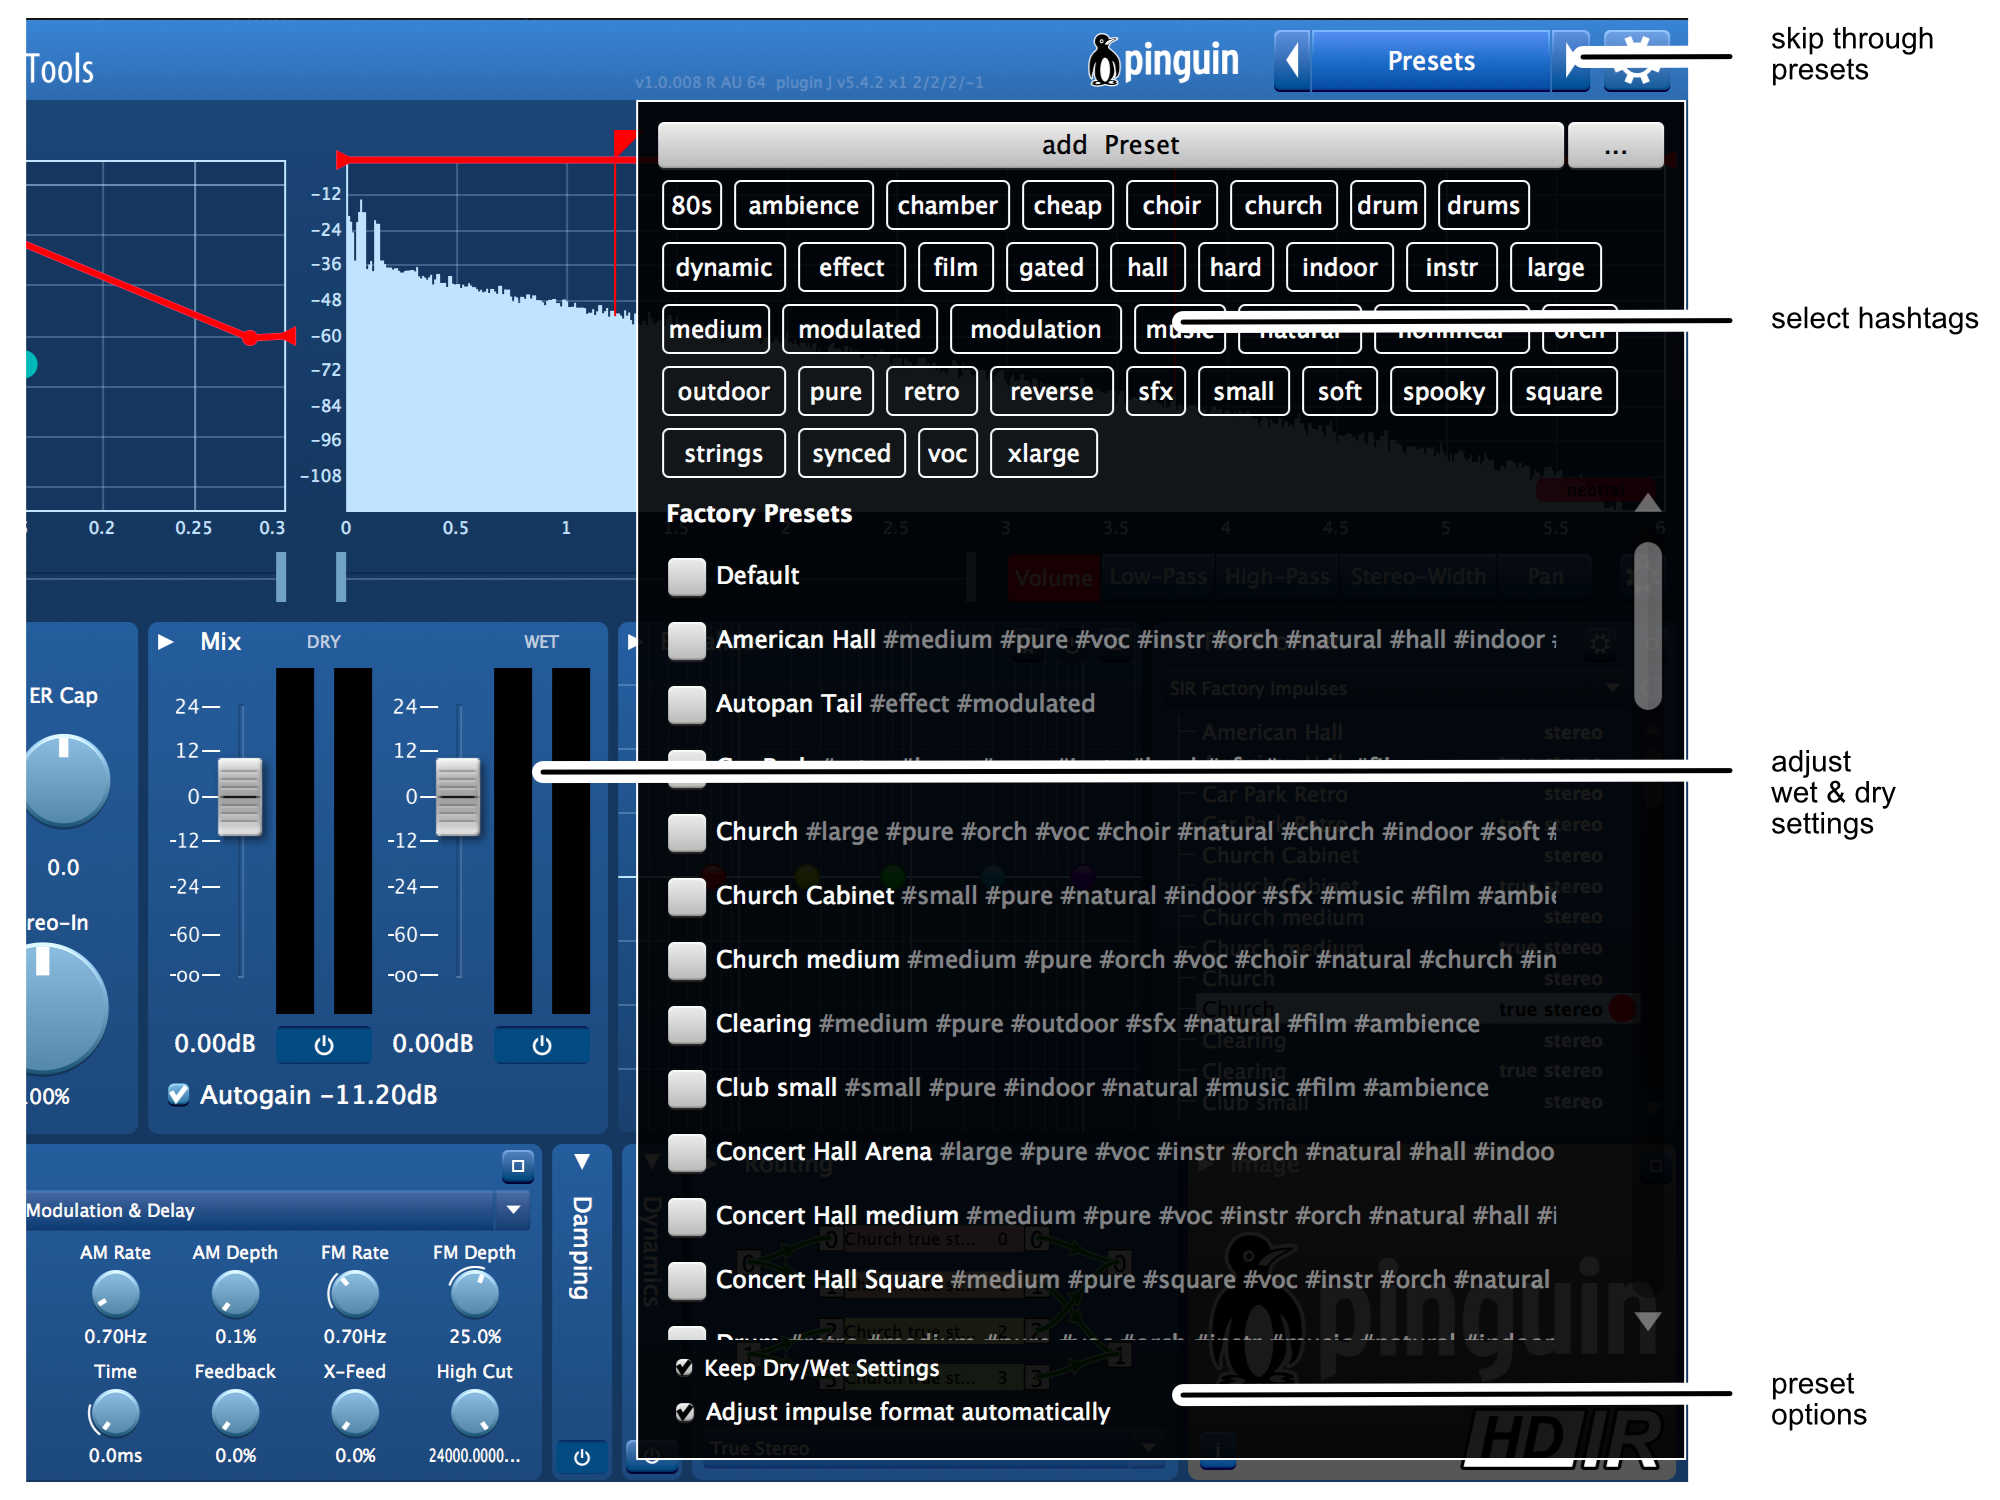
Presets
The hashtag library at the top of the preset box helps you quickly find the right preset.
The preset-browser recognizes automatically hash-tags in the preset name and displays them as a selectable button. To activate a certain preset, just select it.
If you want to delete a certain preset, click on the setting button, right next to the preset-name, and then on "delete".
Manage Presets/Folders
To see the changes, please close and reopen the plugin-GUI.
Please note, if you modify files in the factory presets folder, the original state will be recreated, when you reopen the plug-in.
Settings

Keep Dry/Wet Settings
Adjust impulse format automatically
Global Preferences
Library Preferences
Other GUI Elements
Re-sizer Edge